Easy and effective navigation is essential to have your customers enjoy shopping from your nopCommerce store. With Nop Mega Menu you have advanced nopCommerce navigation managed right from your administration panel.
Live DEMO - see how the Nop Mega Menu plugin would look like in your public store.
Admin DEMO - see the plugin administration.
Working with the Nop Mega Menu is as easy as configuring a few settings from the administration of the plugin. Arranging your Menu Navigation was never this easy with the new enhanced functionality of the Nop Mega Menu.
SETTINGS SECTION
- Enabled - If checked the Nop Mega Menu will be enabled (this setting will enable the widget for Nop Mega Menu plugin.
MANAGE MENUS SECTION
Here you can access all your Menus. You can add new menu and edit or delete existing menus.

EDIT MENUS
- General Settings
- Enabled - If checked your Mega Menu will be enabled.
- Show dropdowns on click - If checked the dropdowns of the Menu Items will be shown on mouse click.
- Name - The name of your menu.
- CSS class - Additional CSS class will be added to the menu element. It can be useful for styling purposes.
- Widget zone - The widget zone where your Menu will appear. NOTE: If you use the default nopCommerce theme, content_before should be selected.
- Limited to stores - Multi-select of all the stores you want your Mega Menu to be limited to.
- Menu Items
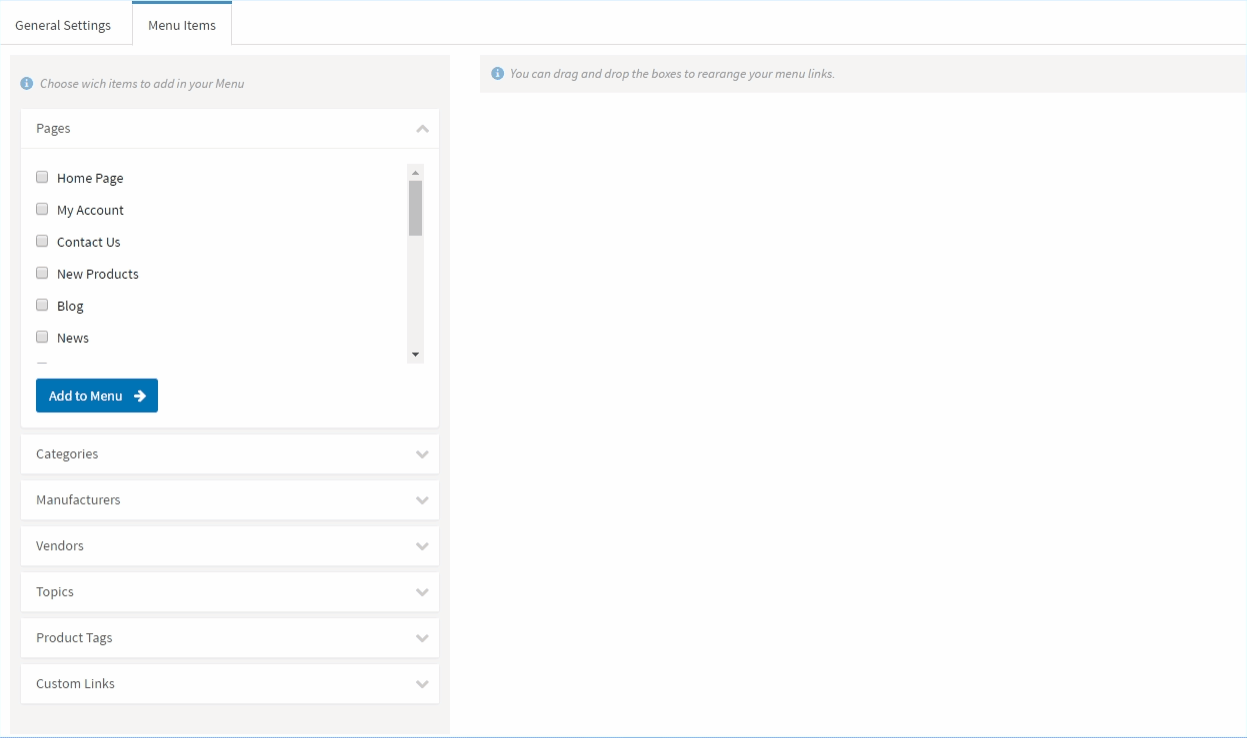
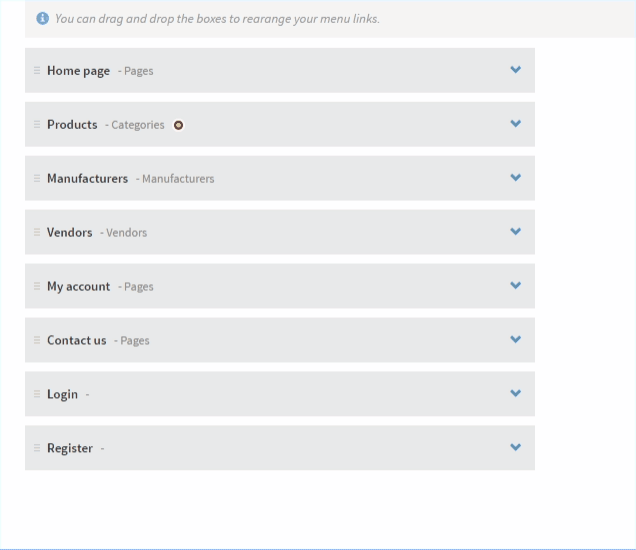
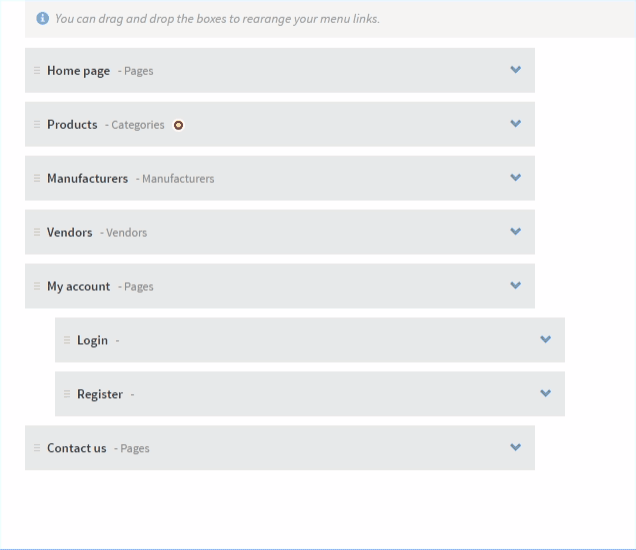
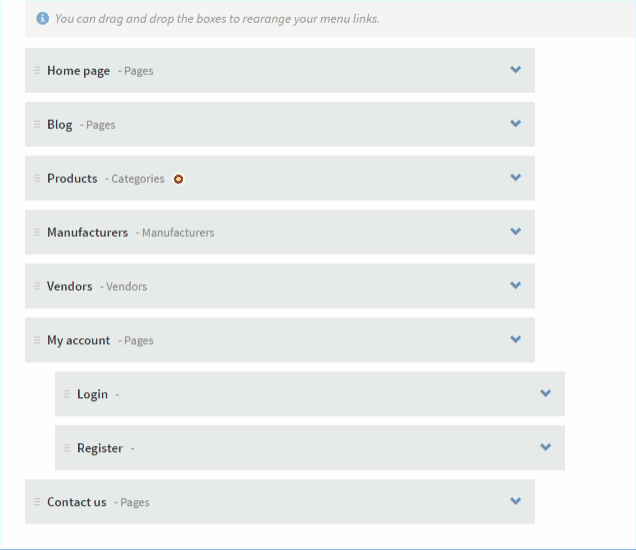
You can edit your Mega Menu in the Menu Items tab. The page is split into two columns. In the left column you can choose what pages you want to add to your menu and in the right column, you can arrange your mega menu items.
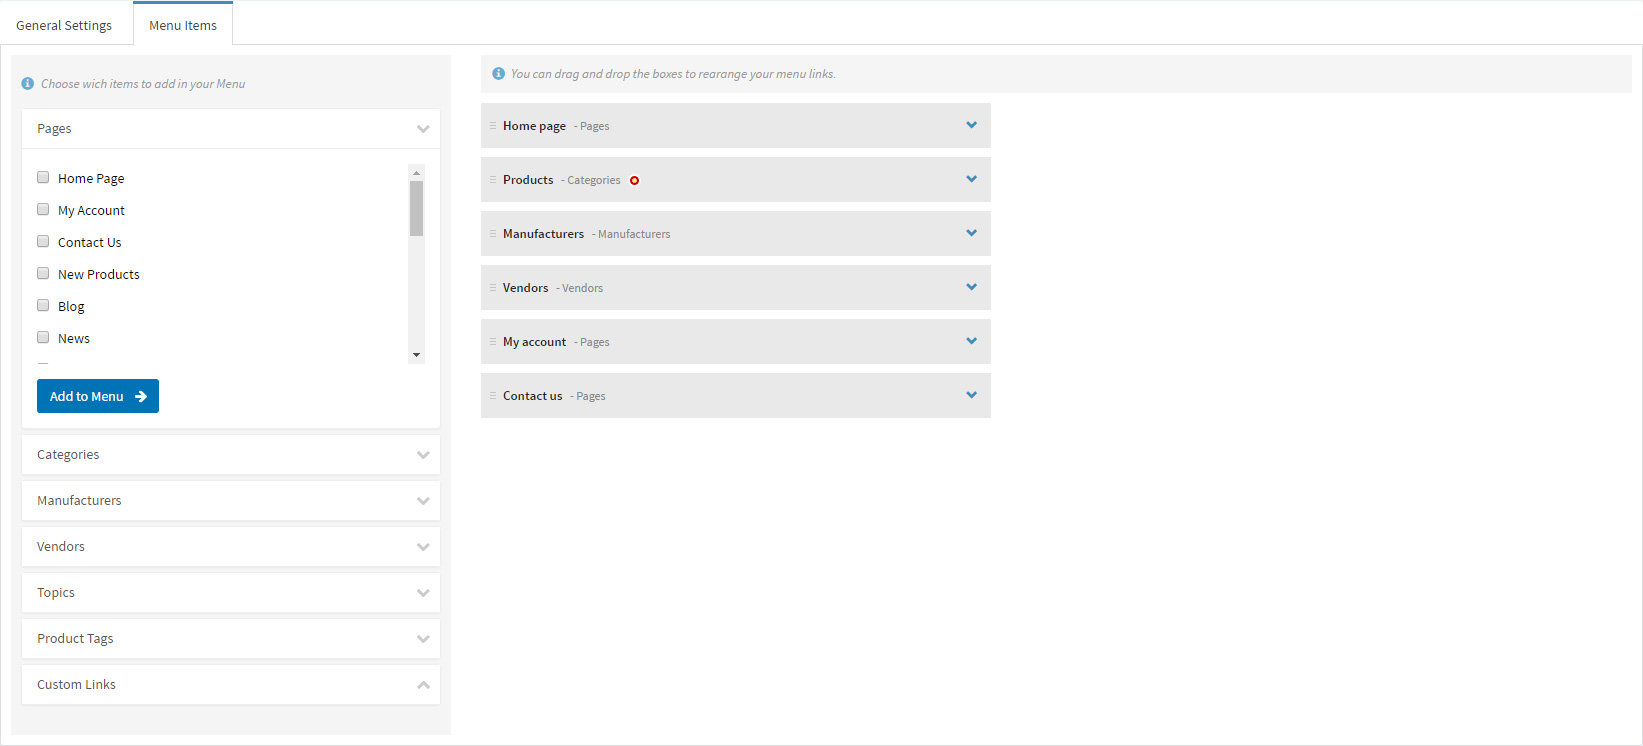
On the right side of the page, you can arrange your Mega Menu Items. You have the ability to see how your Mega Menu will appear on the public store. The Menu Items can be moved, arranged and nested. They can be drag and dropped to the place you want them to occupy.
The left side of the page is where you can choose your Menu Items from. Nop Mega Menu plugin offers you seven types of pages you can choose from:
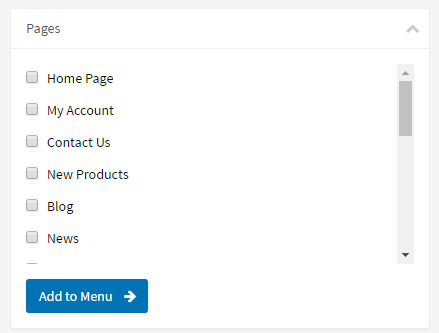
- Pages
From the pages tab, you can choose from a list of predefined default nopCommerce pages to add to your Mega Menu.
- Categories
The Categories tab offers you a list of all the Categories that are enabled and are added to the Top Menu.
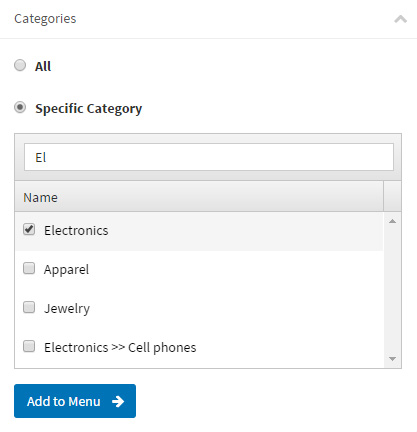
You can add all of your categories in a single Menu Item, with a default name of Products, by choosing the All radio button or add specific categories by choosing the Specific Categories radio button.
- Manufacturers
The Manufacturers tab offers you a list of all the Manufacturers on your nopCommerce store.
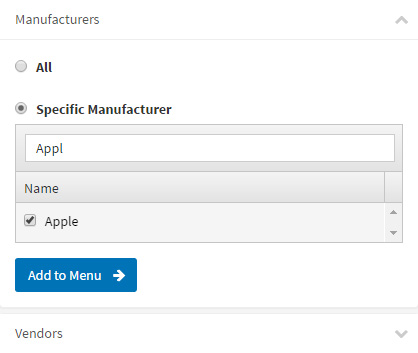
You can add all of your manufacturer`s pages in a single Menu Item, with a default name of Manufacturers, by choosing the All radio button or add specific manufacturer`s pages by choosing the Specific Manufacturer radio button.
- Vendors
The Vendors tab offers you a list of all the Vendors on your nopCommerce store.

You can add all of your vendor`s pages in a single Menu Item, with a default name of Vendors, by choosing the All radio button or add specific vendor's pages by choosing the Specific Vendor radio button.
- Topics
The Topics Tab in Nop Mega Menu offers you a list of all your store Topics to add to your Mega Menu.
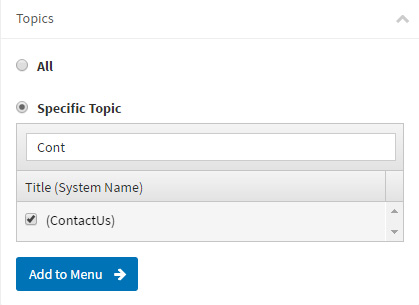
You can add all of your topic`s pages in a single Menu Item, with a default name of Topics, by choosing the All radio button or add specific topic's pages by choosing the Specific Topic radio button.
Note: You would have to Include a Topic in the Top Menu before you add it to the Mega Menu. You can do that from Administration -> Content Management -> Topics(Pages).Note: Some Topic Pages don`t have a Title. Their name in the Topics Tab is enclosed in brackets. You would have to give them a title from Administration -> Content Management -> Topics(Pages). - Product Tags
The Product Tags tab offers you a list of all the Vendors on your nopCommerce store.

You can add all of your Product Tags pages in a single Menu Item, with a default name of Product Tags, by choosing the All radio button or add specific product tags pages by choosing the Specific Product Tag radio button.
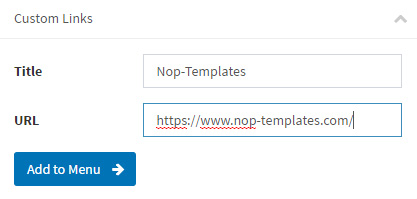
- Custom Links
You can add custom links to your Mega Menu from the Custom Links Tab. You would just need to specify a Title and URL for your Mega Menu Item.
Arranging your Mega Menu
The Nop Mega Menu offers you a variety of actions while editing your Mega Menu. Arranging your menu is now easier than ever before. You will be able to move, nest,edit and remove your Menu Items.
- Moving Menu Items
Moving Menu Items happens with a simple drag-and-drop action like shown in the image below.

- Nesting Menu Items
Nesting Menu Items happens with a simple drag-and-drop action. You will need to move the Menu Item under the desired Parent Menu Item, move it to the right and drop the Menu Item like it is shown in the image below.

- Editing Menu Items
The Nop Mega Menu Plugin gives you the ability to completely customize your Menu Items . By editing your Menu Items you can change their names or the way their dropdown content appears.
You can edit a Menu Item by clicking the downwards pointing arrow at the right end of the Menu Item. A Menu, where you can edit the Menu Item settings, will appear.

- Removing Menu Items
You can remove Menu Items by clicking on the Remove Button like shown in the image below.
Edit Category Menu Item
The Nop Mega Menu gives you the ability to create an easy navigation through the categories of your store for your customers. You can include Menu Items of your categories in your Mega Menu.
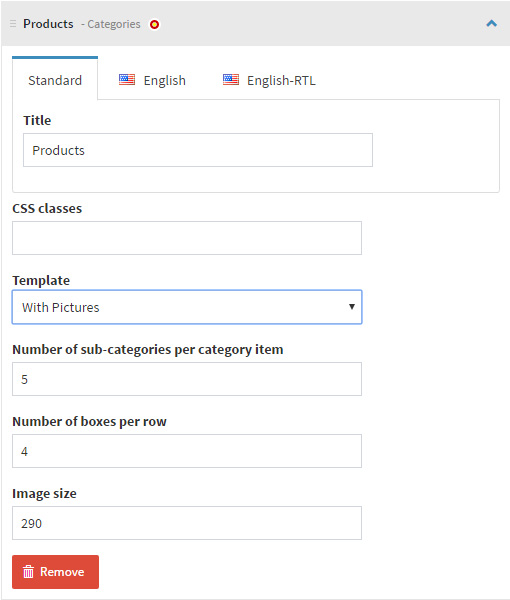
No matter if you choose to display all your categories in a single Menu Item or one by one in different Menu Items the Nop Mega Menu offers you a list of settings from which you can control your Category Menu Items.
- Title - You can change the name of your Menu Item from here.
- CSS class - Additional CSS class will be added to the menu element. It can be useful for styling purposes.
- Template - You can choose the template of the Category Menu Item Dropdown from here. There are three templates you can choose from - simple, with pictures, list:
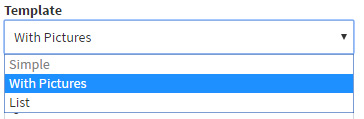
If you choose the simple template your Category Menu Item will not have a dropdown and will be a simple link.
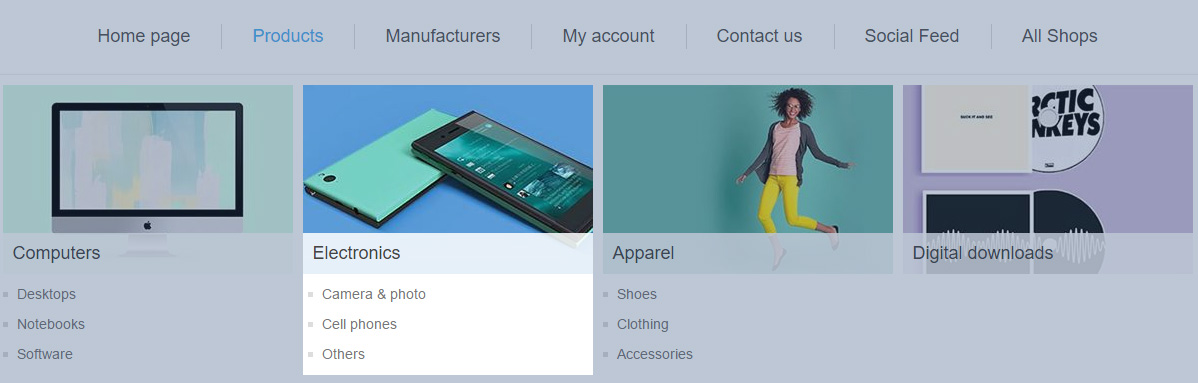
If you choose the "With Pictures" template your Category Menu Item Dropdown will display boxes of the sub-categories which include the subcategory name, sub-category title and the sub-categories of that sub-category (see in the image below).
Choosing the "List" Template will make your Category Menu Item Dropdown display your subcategories in a list like shown in the image below.

- Number of sub-categories per category item - You can set the number of sub-categories per category box.
- Number of boxes per row - The number of subcategory boxes for the Category Menu Item Dropdown.
- Image size - The image size for the boxes in the Category Menu Item Dropdown.
Moving your menu to the footer
You can display your mega menu in different widget zones. In this example, we will be looking at how to display a menu in your footer.
-
Edit the ~\Views\Shared\Components\Footer\Default.cshtml file
-
Add @await Component.InvokeAsync("Widget", new { widgetZone = "footer_column_1" }) after the following code:
<div class="title">
<strong>@T("Footer.Information")</strong>
</div>Note: If you are using nopCommerce 3.9 and below you will need to add the following code @Html.Widget("footer_column_1") -
Edit ~\Plugins\SevenSpikes.Nop.Plugins.MegaMenu\SupportedWidgetZones.xml file and add another widget zone record:
<WidgetZone>footer_column_1</WidgetZone>Note: You can change the "footer_column_1" widget zone to one that most describes your widget zone. -
Restart your nopCommerce application
-
Go to Administration -> Nop-Templates -> Plugins -> Mega Menu -> Manage Menus -> Edit your Menu and choose your newly created widget zone from the Widget Zone setting.
-
Change the CSS class setting to "list" in order for the footer styling to be applied to the menu.