
Multi store support is one of the most powerful nopCommerce features. But what exactly is multi store support? Who is it for? How can you set up multiple stores in nopCommerce? In today’s post we will answer these, and other questions related to the multi store feature.
What is multi store support in nopCommerce?
The multi store feature in nopCommerce allows you to run more than one online store in a single nopCommerce installation. You can have the different stores run on different domains or subdomains, but you cannot have them run in separate virtual directories. In other words, all stores run in the same application pool.
How does this help?
- For starters, you have only one database and web application to cater for.
- You have a single administration for all your websites, where you can manage your catalog, customer and order data.
- Your customers have a single login to all your stores.
- You can share catalog data between stores. For example, you can offer the same product on more than one store.
- Last but not least, since your customer data is also shared, you can use it between stores for marketing campaigns and different cross-sell/up-sell implementations.
Who is the nopCommerce multi store feature suitable for?
- Merchants who need a separate store for B2C and B2B
- Retailers who sell in different countries and need a separate store for each country
- Businesses that operate several brands
Most of the entities in your nopCommerce installation like categories, products, etc. can be limited per store. But it is important to note that your customers cannot be.
Why is this important? Because in nopCommerce, administrators are in fact customers with specific roles. The fact that you cannot limit customers, i.e. administrators, to a specific store, means that you cannot have an administrator with access to only one store. In other words, all your store data is visible to all administrators.
What does this mean? This means that the multi store feature in nopCommerce is really for single store owners with more than one online store.
So, we have established what is multi store support in nopCommerce and who it is suitable for. But there is one more thing you need to know in order to plan your multi store implementation - which entities can be configured per store?
Which nopCommerce entities can be configured per store?
Settings
Every setting in nopCommerce can be configured per store. If you open one of the Settings admin pages you will see the following drop down:

This allows you to edit the settings for all stores, or for a specific store.
When you choose a particular store from the Multi-store configuration for drop-down, an extra checkbox appears on the left side of each setting. You can mark this checkbox if you want to change the value of that specific setting for that particular store. Here is an example:

In this case the Search autocomplete enabled setting is overridden for the chosen store (because the checkbox on the left is marked).
The Search term minimum length setting is not overridden (the checkbox on the left is not marked) which means that your nopCommerce application will use the value that is set for all stores.
Products
Each of your products has a Limited to stores setting. This setting is located in the Mappings section of your product administration panel. (Note: You can find the Mappings section by going to Administration → Catalogs → Products.)
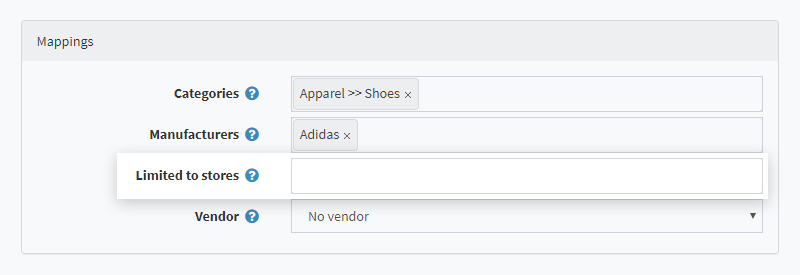
You can either specify on which stores the product will be available, or leave the Limited to stores setting empty which means that the product will be available for all stores.
Product prices
We already established that you can offer the same product on more than one store. You can also configure product prices per store. In other words, you can set different product prices for the different stores. To do this, you have to use tier prices.
Here is how you can configure product prices per store:
- Go to Administration → Products
- Choose the product which price you want to configure → Click Edit
- Scroll down to the Tier Prices panel → Click on the Add new tier price button
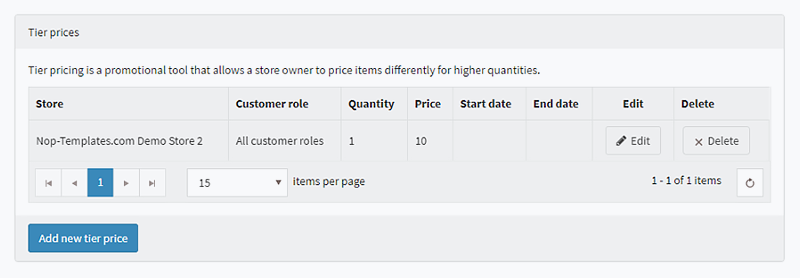
- When you click on the Add new tier price button, an Edit tier price details window will open. From there, you can configure the product price per store.

Plugins
Many nopCommerce plugins have a multi store configuration. All of the plugins that come with nopCommerce out-of-the-box and all Nop-Templates plugins can be configured per store. Such plugins are Carousel, Sale of the Day, Mega Menu, and more.
What other entities can be configured per store?
Other entities that can be configured per store are product categories, themes, manufacturers, message templates, topics, news pages, blog pages, polls, countries, languages, and currencies.
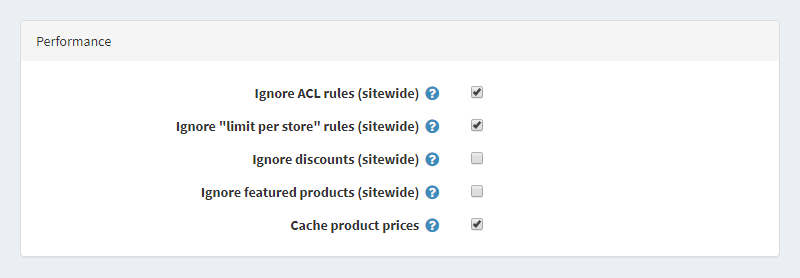
Keep in mind that there is an Ignore limited per store rules (sitewide) setting. (Note: This checkbox is located in the Performance section of your Catalog Settings.)
If you have this setting enabled your store mappings will not work. So, if you cannot limit an entity to a specific store (or stores), make sure that this setting is not enabled.
How to set up multiple stores in nopCommerce?
1. Go to the admin panel of your nopCommerce store
2. Go to Configuration → Stores → Click on +Add new (top right corner)
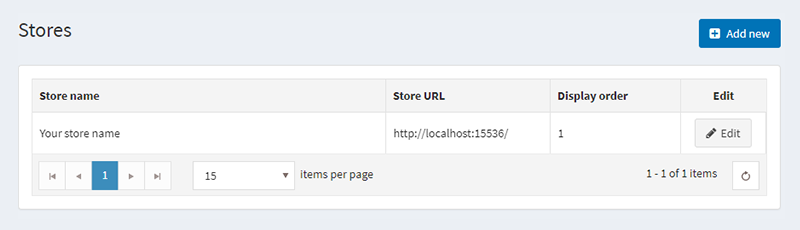
3. Fill in the required information
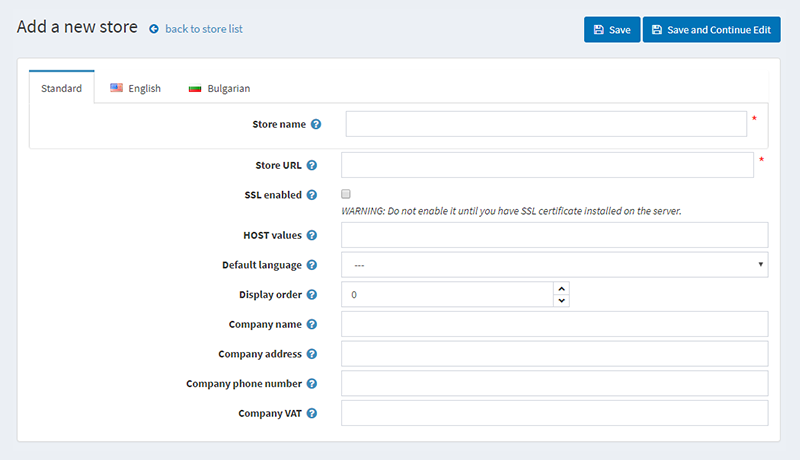
- Store name. The name of your store is localizable, i.e. it can be displayed in different languages.
Why is this important? In other words, where is the Store name used at all? For one thing, your Store name is displayed in the admin panel of your nopCommerce store. For another, some Message Templates have a %Store.Name% token. This token is replaced by the Store name for each localized store. - Store URL. You need to have a domain or a subdomain for your second store prior to adding it to nopCommerce.
- SSL enabled. Mark the SSL enabled checkbox only if you have an SSL certificate for your domain.
Having an SSL certificate is an absolute must. An SSL certificate ensures that your customers’ sessions on your website (visits and shopping behavior) are secure. Not having an SSL certificate will undermine your credibility. In addition, Google will rank your website lower if it does not have an SSL certificate.
Note: Before you mark the SSL enabled checkbox, you need to make sure that your SSL certificate is installed and configured on your website.
Why? Because if you mark the SSL enabled checkbox, nopCommerce will force the administration and the login page through https://. If you haven’t configured SSL correctly, this can’t happen. Which means that you won’t be able to access your administration panel and change your settings. - Host values. Say, your website is called https://www.second-store.com. The Host values for your store would be www.second-store.com and second-store.com. In other words, the Host values ensure that visitors will reach your website regardless of whether or not they type www.
- Default language. The default language of your store.
- Display order. The display order of the store in your admin panel.
- Company information. Company name, address, phone number, VAT (if applicable). Providing correct company information is a must, because, similar to the SSL certificate, this adds to your credibility. Plus, potential customers will be more likely to buy from your website if they know that they have a way of contacting you at all times
When you fill in this information, click Save.
Basically, this is how you add a second (or third, or fourth) store to your nopCommerce administration panel. However, you still have to go through a few more steps to complete the store setup.
4. Map your second store domain or subdomain to your website.
If you are using a shared hosting, then you can do this through your hosting control panel.
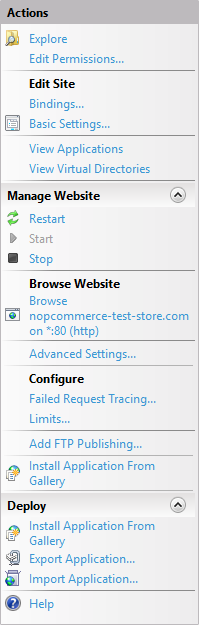
If you don’t use a third-party hosting solution, i.e., if you host your nopCommerce website on your server, you have to:
- Go to IIS → right panel → Edit Site → Bindings...
- Site Bindings → Click on Add…
- Paste your domain address in the Host name field of the Add Site Binding section
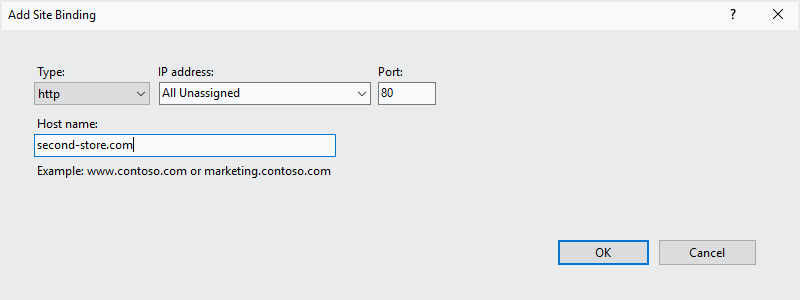
- Your final bindings should look like this:
.png)
5. Edit the DNS records for your store domain.
Go to your domain control panel (the control panel is provided by your domain provider).
If you’re using a hosting provider you will simply need to change the name servers for your domain to be the name servers of your hosting provider.
If you’re hosting your website yourself, you will need to add two A records for your domain:

That's it! You have completed the multi store setup!
What you need to know about hosting multiple nopCommerce stores?
NopCommerce consumes on average 300 MB of RAM which means that, in order for your website to run smoothly, you will need at least 500 MB RAM.
However, when you run more than one online store in a single nopCommerce installation, you will need more resources (because your server will have to handle more transactions).
We recommend choosing a hosting plan which offers at least 1 GB RAM and increase this amount with at least 1GB for each store.
See which are the best nopCommerce hosting providers for 2019
What developers should know about the multi store implementation in nopCommerce?
If you are not a nopCommerce developer, please, feel free to skip this section.
But if you are, you might be wondering how does all this magic work. The answer is quite simple, which can only testify to the cleverness of the nopCommerce approach.
As you can see, every store has HOST VALUES mapped to it. Therefore, when a request arrives in the nopCommerce pipeline, nopCommerce inspects the HOST HEADER value of the request and sets the current store in the WebStoreContext.
The WebStoreContext is available to all controllers and services, so all actions can pass the current store to data retrieval operations which require it.
In the database, all entities (products, categories, manufacturers, etc.) are mapped to the different stores via a general table called StoreMapping. But what you really would be using in your nopCommerce development code is the StoreMappingService in the Nop.Service.Stores namespace.
The StoreMappingService has all the methods required to manage the mapping of the entities to the different stores. Most importantly, it has a generic method called Authorize, which when passed an entity (a category or product for example) determines if the entity is visible in the current store.
Wrap-up
NopCommerce is not multi-tenant. All administrators have access to all stores and store data.
In other words, the multi store feature in nopCommerce is suitable for single store owners who need to run multiple online stores.
You can manage all stores from a single admin panel and configure almost every data entity per store. Keep in mind that if you want to configure product prices per store, you will need to use tier prices.
One last thing you need to remember is that you will need a really good hosting provider.
We hope you found this guide helpful!
Let us know if you have any questions, or need technical assistance with the multi store setup! You can do this by leaving us a comment in the comments section below.


Best,
The Nop-Templates team
I am a developer, I ask about if I can from my general website make a customer try an online store before he decide to contract me to create his online store.
Can the idea mentiod in the article help me do that? I yes, can point me to some details.
Thanks to: nop-templates.com
Can you, please, give us more details, i.e., explain exactly what you want to achieve?
Best,
The Nop-Templates team
thanks for reply
I want the customer to try before buy. by creating a demo store for him to try a store (uploads products and play with front end and admin dashboard).
my question is, can I benefit from multi store multi vendor in nopcommerce to achieve this idea?
I want to do all that by code from my general site. (i.e create a subdomain to customer to represent his identity, create a vendor account for him). all these from a single nopCommerce installation. I want a single nopCommerce installation to be used for my customers for trying store only to reduce the cost of hosting.
thanks nop-template
Nasser
You cannot use the multistore or multivendor configurations since the administration in those cases is one and you cannot really control which store a user controls in the administration since the ACL cannot be configured per store.
You can, however, do the same thing we do when a client request a test store.
We have a ready configuration on our server - nopCommerce files, theme files and a configured database (demo database), which we can just deploy in a matter of minutes and assign a subdomain from our main site (e.g., our domain is nop-templates.com and we create subdomains like subdomain.nop-templates.com for clients) through IIS.
After that, we give our clients the credentials for the demo database so they can do whatever they want with the store without affecting anything else hosted on the domain.
Finally, after the trial is over, we disable the demo store made for the client and delete all the files and database.
In this way, clients don't have access to the theme files before they buy them but have a way of playing with the store and configuring a database. After the trial is over, you can even send them the database so that they can use it in their own project without having to reconfigure.
Hope this helps,
The Nop-Templates team
www.store1.com
www.store1.com.au
www.store1.co.uk