How the plugin works
- Export products from nopCommerce to Salesforce
- Export customers from nopComerce to Salesforce by creating leads or accounts based on whether the customer has spent any money in the nopCommerce store.
- Export orders from nopCommerce to Salesforce. Orders that are not completed are mapped to opportunities. When an order is completed a Salesforce order is created.
- Convert leads to accounts based on whether a customer who was previously exported as a lead because they have not spent any money in the store, now have spent some money.
- Export shopping carts from the nopCommerce store and map them to opportunities in Salesforce.
Installation and Setup
1. Install and setup the plugin on your nopCommerce installation
- First install the SevenSpikes.Core plugin
- Install the SevenSpikes.Nop.Plugins.NopSalesForce
- Go to Plugins -> Nop Salesforce -> Settings and set all the required settings which are self-explanatory.
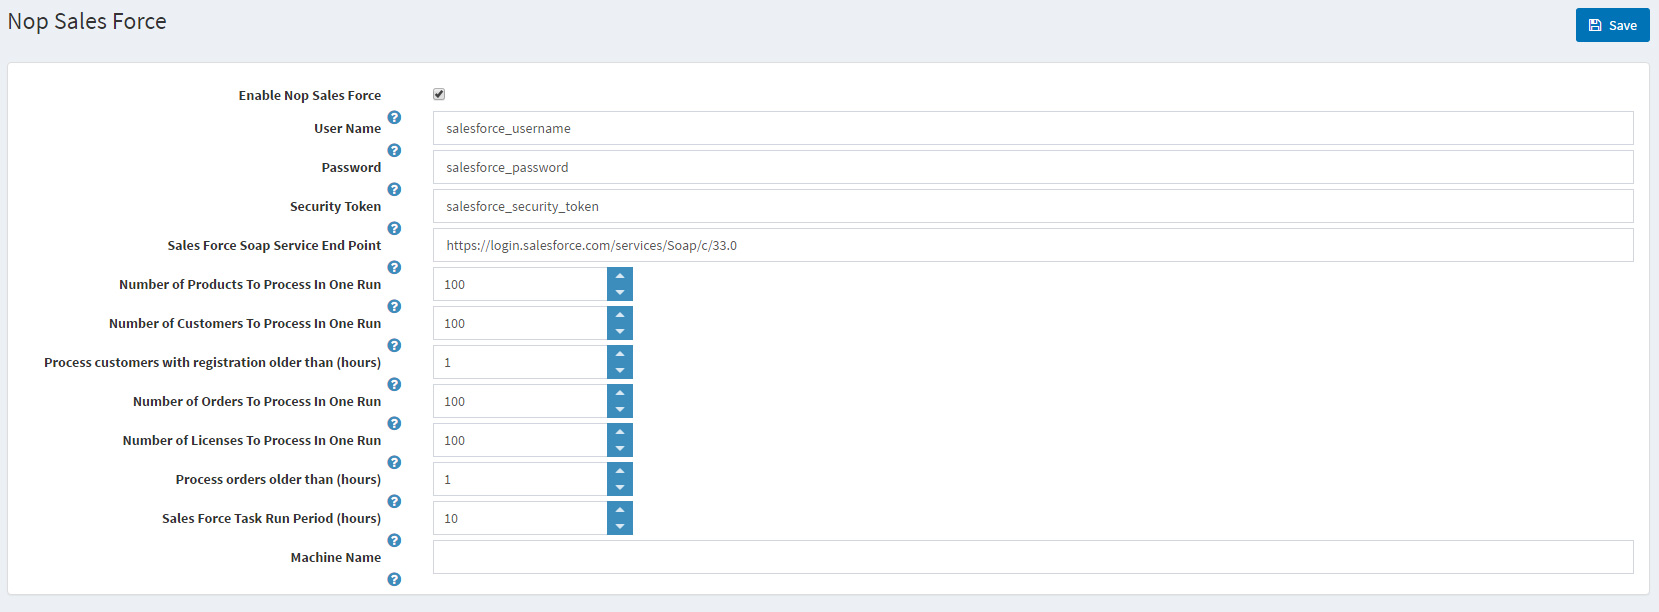
This setting is used to prevent the plugin from being accidentally run on a machine (a dev machine for example) and therefore exporting data to a Salesfore account, which should not be exported.
2. Setup your Salesfore account.
- Make sure that you have API access on your Salesforce account!
- Install this package on your Saleforce account:
https://eu5.salesforce.com/packaging/installPackage.apexp?p0=04tw0000000EwSY
This package will add all the required custom fields to your Salesforce objects.
3. You will need a Security Token for the plugin settings. To generate one you will need to do the following:
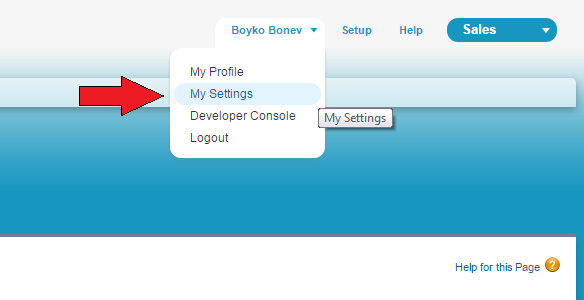
- Log to Salesforce.
- Go to My Settings:
- Go to Reset My Security Token which you could find at Personal menu at left.
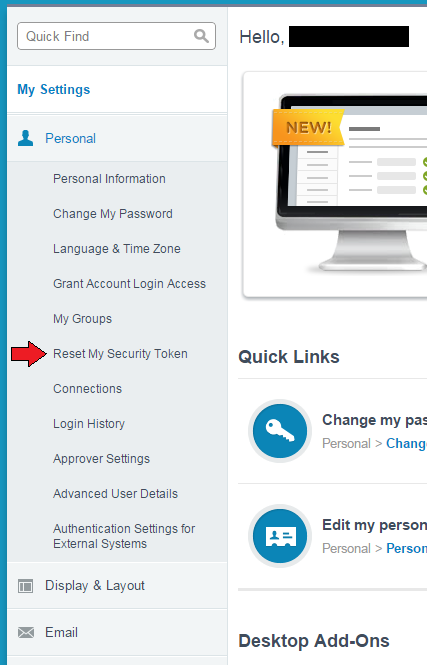
- After you click the Reset Security Token button you will recieve email with the new security token.
4. Run the plugin from your nopCommerce store.
The plugin installs a scheduled task which will run every number of hours (specified in the settings of the plugin).
This background task will export any new data you might have in your store.
You can run this task on demand especially if you are running the plugin for the first time or would like to test it.
To run the scheduled task go to the nopCommerce administration -> System -> Scheduled Task -> Run the Nop Salesforce task.
You should start seeing data in your Salesforce account. If you do not, you can inspect the nopCommerce -> System -> Log for any errors or messages from the plugin.
Recommended Salesforce Setup
1. Set the Salesforce Currency Locale to your default store currency in nopCommerce.
All of the prices exported by the plugin (product price, order total, discount amount, etc.) are exported in the primary store currency. Please make sure your primary store currency matches with the Currency Locale in your Salesforce account. For example if your primary store currency is USD and a dress in your nopCommerce store costs $50, when it is exported in Salesforce you will se that the dress costs € 50 if your Currency Locale in Salesforce is set to EUR.
To solve this, please login to your Salesforce profile, go to Setup-> Company Profile-> Company Information and click the Edit button. After that set the Currency Locale to your default nopCommerce store currency and click the Save button.
2. Add the custom nopCommerce fields to your Salesforce page layouts.
When you install the package to your Salesforce account it will add custom fields that are populated with data exported from your nopCommerce store. These custom fields are not automatically added to your page layouts. This means that if you open an opportunity, order, lead, account or anything else that has custom fields you will not see them. This custom fields however contain valuable information, so we recommend adding them to your page layouts. To do this please login to your Salesforce profile and go to Setup-> Customize-> Orders-> Page Layouts and click the Edit link. On the Edit page you can see all available fields at the top of the page. Find the Order Total field, drag and drop it inside the Order Information section, at a place of your choosing. Repeat this procedure for all fields that you may find useful.
After you finish addng the custom fields please click on the Save button at the top left of the page.
Please repeat this procedure for the following objects:
- Opportunity
- Opportunity Product
- Product
- Order Product
- Lead
- Account
- Contact
To find these objects please go to Setup-> Customize.
Troubleshooting - known errors
-
INVALID_FIELD_FOR_INSERT_UPDATE:<object>: bad field names on insert/update call: <fields>
This error can occur if you are using the following:
- Salesforce Professional Edition
During a sync session, you may encounter an error like the following:
The following errors occurred while calling the create method of SalesForce web service: Field ids: Active__c, StatusCode INVALID_FIELD_FOR_INSERT_UPDATE, Message Account: bad field names on insert/update call: Active__c
The table and field names might be different.
This error is caused by a limitation in Professional Edition about field-level security. To resolve this error, edit the page layout for the object that caused the error (in the example error message, the object is Active__c) and ensure that all fields available on the object are added to the page layout. This will make the fields accessible during the sync process and will stop the error from occurring.