Working with the Nop Cloud Zoom
Please read the following steps for more information on how to configure the Nop Cloud Zoom
Working with the Nop Cloud Zoom is as easy as configuring a few settings from the administration of the plugin. When the plugin is installed it comes preconfigured with default values for the settings
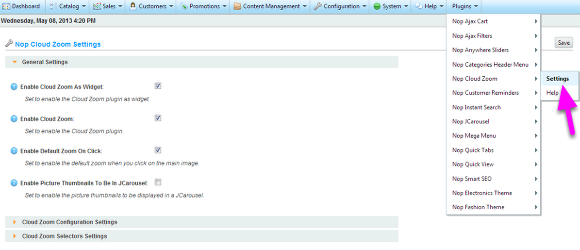
a) General Settings
- Enable Cloud Zoom As Widget - Sets whether to enable or disable the Widget of the Cloud Zoom plugin.
- Enable Cloud Zoom - Sets whether the Cloud Zoom is enabled.
- Enable Default Zoom On Click - Sets whether the default nopCommerce zoom is enabled when you click on a product image.
- Enable Picture Thumbnails To Be In JCarousel - Sets whether to display the pictures thumbnails on the product page in JCarousel.
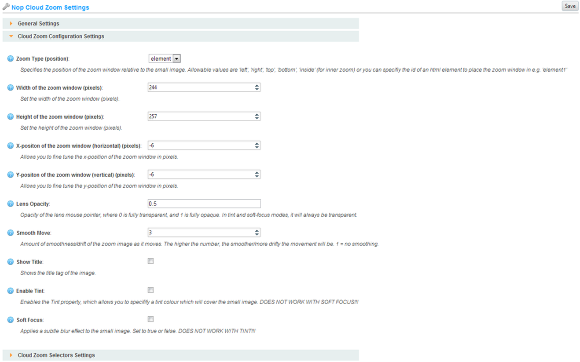
b) Configuration Settings
- Zoom Type - Specifies the position of the zoom window relative to the image being zoomed. Allowable values are 'left', 'right', 'top', 'bottom', 'inside' (for inner zoom) and 'element'. The default value is 'element'. Please refer to step 1) Zoom Types for more information about the zoom types.
- Width of the zoom window - Specifies the width of the zoom window in pixels (does not work with Zoom Type 'inside').
- Height of the zoom window - Specifies the height of the zoom window in pixels (does not work with Zoom Type 'inside').
- X-Position of the zoom window - With this option, you can fine tune the horizontal position of the zoom window (does not work with Zoom Type 'inside').
- Y-Position of the zoom window - With this option, you can fine tune the vertical position of the zoom window (does not work with Zoom Type 'inside').
- Lens Opacity - Specifies the opacity of the lens mouse pointer, where 0 is fully transparent and 1 is fully opaque. If Tint or Soft Focus are enabled, it will always be transparent. (does not work with Zoom Type 'inside').
- Smooth Move - Specifies the amount of smoothness/drift of the zoomed image as it moves. The higher the number, the smoother/more drifty the movement will be. 1 = no smoothing.
- Sow Title - When enabled gives you options for showing the title tag of the image. Please refer to step 2) Show Title for more information about the title options.
- Enable Tint - Enables the Tint property, which allows you to specify a tint color that will cover the image being zoomed. Please refer to step 3) Tint for more information about the tint options. (does not work with Soft Focus or Zoom Type 'inside').
- Soft Focus - Enables a subtle blur effect to the image being zoomed. (does not work with Tint or Zoom Type 'inside').
c) Selectors Settings
The following settings are System Settings and should be used only if you have done changes to the style or id properties of the product page of your nopCommerce website. The Nop Cloud Zoom is integrated via widget and jQuery, therefore the plugin need to know how to find these html elements in the product page.
- Default image container selector - This is the selector of the default nopCommerce image container (the big and small images that are displayed on you product page). When the Nop Cloud Zoom plugin is enabled, the default container is replaced by the Nop Cloud Zoom.
- The selector of the element that will contain the cloud zoom window (only appears when the Zoom type is set to "element") - This is the selector of the parent element, that will contain the Cloud Zoom Window. The Cloud Zoom Window is the window that contains the zoomed image and appears when you hove over an image with your mouse.


